Why Most Beginners Get Wall Sits Wrong (And How to Fix It)
When I first tried wall sits, I thought I had them figured out. I slid down the wall, held for 30 seconds, and felt a burn in my quads. But three days later, my knees ached, my lower back was tight, and I couldn't walk down stairs without wincing. The problem wasn't the exercise itself -- it was my form. Most beginners make the same mistakes: knees that drift past the toes, a lower back that arches off the wall, and breath holding that turns a simple hold into a dizzying ordeal.
The wall sit is one of the most effective isometric exercises for building leg endurance and core stability, but only if you do it correctly. This guide gives you a structured 4-week progression called the Wall Sit Ladder, along with the breathing mechanics, form checks, and modifications that most online tutorials skip. By the end of Week 4, you'll be holding a 60-second wall sit with clean technique -- and without the aches I endured.
How to Do a Wall Sit Correctly for Beginners (Step-by-Step)
Before we talk about sets and reps, let's nail the setup. The wall sit is deceptively simple, but small details make or break the exercise.
Setup and Positioning
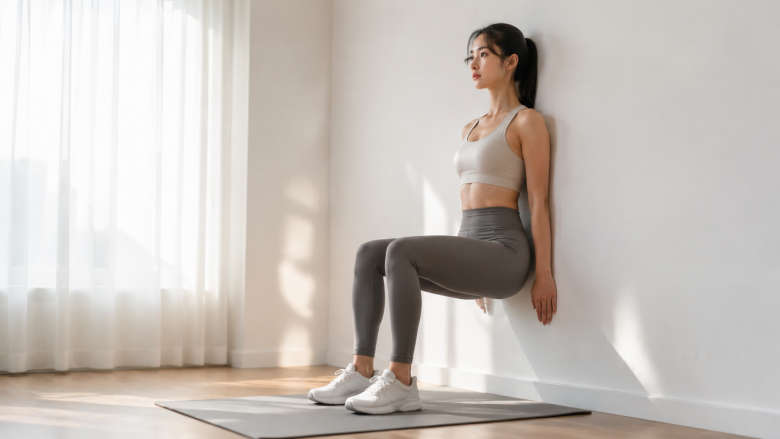
Stand with your back against a smooth, sturdy wall. Walk your feet out about two feet from the wall, hip-width apart. Your toes should point straight ahead or slightly outward -- never turned in. Slowly slide your back down the wall until your thighs are parallel to the floor. If you're new to the movement, stop at a 45-degree angle (thighs halfway down) instead of full 90 degrees. This reduces stress on the kneecaps while still engaging the quads.
Your knees should be directly above your ankles -- not in front of your toes. If you can't see your toes when looking down, your knees are too far forward. Shift your hips back slightly or walk your feet farther from the wall. Your back should stay flat against the wall. If you feel your lower back arching away, you're likely sitting too low or your core isn't engaged.
Breathing Mechanics (The Thing Nobody Tells You)
Most people hold their breath during a wall sit. This spikes blood pressure, makes the hold feel harder, and can cause dizziness. I learned this the hard way after nearly passing out on my second attempt. Instead, you want a steady, controlled breath: inhale slowly through your nose for 3 seconds, then exhale through your mouth for 3 seconds. Keep your ribs down and your belly braced -- imagine someone is about to punch you in the stomach. This brace creates intra-abdominal pressure that protects your spine and keeps your pelvis stable.
If you find yourself holding your breath, try counting your breaths aloud. Say "in" and "out" with each cycle. This forces you to keep the airway open. Another trick: whistle softly while exhaling. The resistance keeps your breath slow and controlled.
Common Wall Sit Mistakes (And How to Spot Them)
I've coached dozens of beginners, and these are the five most common errors I see. Check each one before you start your ladder program.
Knees Caving Inward
When your quads fatigue, the knees often collapse toward each other. This puts torque on the ACL and MCL ligaments. To fix it, actively push your knees outward against an imaginary resistance band. Keep your weight evenly distributed across your whole foot -- not just the heels or toes. If you can't maintain knee alignment, shorten your hold time or reduce the depth.
Arching the Lower Back
As you slide down, the lower back naturally wants to curve away from the wall. This shifts the load from your quads to your lumbar spine. The fix: tuck your pelvis under slightly (like you're trying to press your lower back into the wall). Engage your glutes by squeezing them together. This locks your pelvis in a neutral position and keeps your back flat.
Heels Lifting Off the Floor
If your heels come up, you're shifting weight onto your toes. This places excessive load on the patellar tendon. Keep your heels planted and press them firmly into the ground. If you can't keep your heels down, your feet are too close to the wall. Move them a few inches farther out.
Looking Down at Your Feet
Dropping your chin tucks your head forward, which can pull your upper back off the wall. Keep your head and shoulders against the wall. Look straight ahead, not down. A good cue: imagine holding a tennis ball between your chin and chest.
Holding Your Breath
We covered this above, but it deserves repeating. Breath holding is the most common error among beginners. It makes the hold feel twice as hard and can cause a headache or lightheadedness. If you feel dizzy, stop, stand up, and breathe normally before trying again.
How Long Should a Beginner Hold a Wall Sit?
This is the most common question I get, and the answer is not a single number. For a complete beginner, starting with 15-second holds is smart. That's enough to feel the burn without compromising form. As you progress, you can increase hold time, but only if you can maintain perfect form for the entire duration. If your knees cave or your back arches at the 10-second mark, you're not ready for a longer hold.
Most beginner programs suggest 20-30 seconds, but I've found that jumping straight to 30 seconds leads to sloppy form. Instead, follow the Wall Sit Ladder below, which builds gradually over four weeks.
The 4-Week Wall Sit Ladder Program
This program transforms the wall sit from a static hold into a measurable, goal-oriented training protocol. You'll do three sessions per week, with at least one rest day between sessions. Each week increases the work-to-rest ratio slightly, giving your legs time to adapt without overloading the joints.
Week 1: Foundation
- Sets: 3
- Hold time: 15 seconds
- Rest between sets: 60 seconds
- Depth: Thighs at 45 degrees (halfway down)
- Goal: Master the setup and breathing. Focus on keeping your back flat and knees aligned.
If you feel any knee pain, stop immediately. Pain is a signal, not a challenge. For the first week, your only goal is to finish all three sets with clean form. If you can't complete a set, reduce the hold time to 10 seconds.
Week 2: Building Endurance
- Sets: 4
- Hold time: 20 seconds
- Rest between sets: 45 seconds
- Depth: Thighs at 45 degrees. If you feel ready, try one set at 90 degrees.
- Goal: Increase volume while maintaining breath control. Use the 3-3 breathing pattern consistently.
By the end of Week 2, you should be able to hold 20 seconds with no knee pain and no arching. If you still struggle with knee alignment, place a small yoga block or rolled towel between your knees and squeeze it gently. This cues your knees to stay apart.
Week 3: Increasing Depth
- Sets: 4
- Hold time: 25 seconds
- Rest between sets: 30 seconds
- Depth: All sets at 90 degrees (thighs parallel to floor).
- Goal: Adapt to the deeper position. Your quads will work harder, but your back must stay flat.
If you can't hold 90 degrees for 25 seconds, drop back to 45 degrees for the last set. There's no shame in scaling back -- it's better than reinforcing bad habits. I've seen experienced lifters struggle with this depth because they skipped the progression.
Week 4: The 60-Second Challenge
- Sets: 3
- Hold time: 30 seconds
- Rest between sets: 20 seconds (short rest simulates the fatigue of a longer hold)
- Optional: On your final session, attempt one set of 60 seconds at 90 degrees.
- Goal: Build confidence and mental toughness. You should be able to hold 60 seconds with good form by the end of the week.
If you attempt the 60-second hold, use a timer and focus on your breath. The last 15 seconds are the hardest. Your legs will shake -- that's normal. The shaking is your muscles recruiting more motor units to maintain the position. It's a sign of progress, not failure.
What Happens If You Do One Minute Wall Sit Every Day?
I get this question a lot, and the answer is complicated. Doing a daily one-minute wall sit will improve your leg endurance and core stability, but it's not a magic bullet for fat loss or quad size. Isometric exercises like wall sits build strength at a specific joint angle (the angle you hold). They don't build muscle through a full range of motion, which is why you still need squats, lunges, or other dynamic exercises for balanced leg development.
However, daily wall sits can improve your ability to stabilize your pelvis and knees, which carries over to other exercises. I've found that doing a 60-second wall sit before a squat session helps activate the quads and glutes. But doing it every day without rest can lead to overuse of the patellar tendon, especially if your form isn't perfect. If you want to do wall sits daily, keep the depth at 45 degrees and limit the hold to 30 seconds to protect your knees.
For a deeper dive on how to pair wall sits with other gentle movements, see our 10-Minute Daily Stretch Routine for Beginners, which includes quad and hip flexor stretches that complement the wall sit.
Modifications for Knee Sensitivity
Not everyone can handle a full 90-degree wall sit, and that's okay. The wall sit is a high-load exercise for the patellofemoral joint. If you have knee pain, patellar tendonitis, or a history of knee issues, you need to modify.
Reduce the Depth
Instead of going to 90 degrees, stop at 45 degrees (thighs halfway down). This cuts the knee flexion angle from 90 degrees to roughly 45 degrees, which significantly reduces patellofemoral compression. Most people with mild knee sensitivity can tolerate this depth without pain. You can still follow the Wall Sit Ladder but use the reduced depth for all four weeks.
Use a Cushion Behind the Knees
If you feel pressure behind the kneecap, try placing a small folded towel or foam pad behind your knees. This changes the angle slightly and can relieve pressure. Another option: wear knee sleeves that provide compression and warmth, which improves blood flow to the joint.
Try a Shorter Hold with More Sets
If holding 15 seconds causes pain, try 10 seconds with 5 sets. The shorter hold reduces cumulative stress on the knee. Increase hold time by 2 seconds per week instead of 5. The key is to listen to your body. Never push through sharp knee pain -- it's not a sign of weakness, it's a sign that something is off.
How to Track Your Progress (Without Overcomplicating It)
Most beginners just count seconds, but there's a better way. Use a simple three-point form check after each hold:
- Knees: Did they stay aligned over the ankles? Did they cave inward?
- Back: Was it flat against the wall? Did I feel the arch?
- Breath: Did I hold my breath at any point?
Rate each one as pass or fail. If you fail two or more, reduce the hold time or increase the rest. If you pass all three, you're ready to progress. This systematic approach is what separates a random wall sit session from a deliberate training protocol.
You can also track calories burned during wall sits using our Exercise Calories Per 30 Minutes Calculator. While wall sits aren't a high-calorie burner (roughly 3-4 calories per minute for a 150-pound person), combining them with other exercises in a circuit can add up. For a comparison, see our Row Calories For Beginners Calculator to see how wall sits stack up against rowing.
Advanced Considerations for Beginners (Edge Cases)
Most articles stop at the basics, but here are a few things I've learned from coaching that you won't find in the top results.
Wall Surface Matters
Not all walls are equal. A textured wall can cause your back to slide down unevenly, which torques your spine. Use a smooth, dry wall. If you're at home, a painted drywall surface is fine. Avoid tile or brick walls unless you're wearing a shirt with enough friction. I've seen people slip on a glossy finish and strain their hamstrings trying to catch themselves.
Footwear vs. Barefoot
I prefer barefoot wall sits because they allow better ground feedback -- you can feel if your weight shifts to your toes. If you wear shoes, choose flat-soled ones like Converse or minimal shoes. Running shoes with thick, cushioned heels tip your weight forward, making it harder to keep your heels down.
The Wall Sit as a Warm-Up
Instead of doing wall sits as a standalone exercise, use them as a warm-up for squats or deadlifts. A 20-second wall sit before a squat session activates the quadriceps and glutes without fatiguing them. One thing I've noticed: after a few weeks of the Wall Sit Ladder, my squat depth improved because my body learned to maintain a neutral spine under load.
What About Adding Weight?
I don't recommend adding weight to wall sits until you can hold a 90-degree position for 60 seconds with perfect form. Even then, be cautious. Holding a dumbbell or plate increases compression on the spine and knees. If you want to progress beyond the ladder, try single-leg wall sits or wall sits with a calf raise at the top of the hold. These add variety without loading the knees excessively.
Putting It All Together: A Sample Workout Session
Here's what a complete session looks like, using the Week 2 parameters. You can do this as a standalone leg workout or tack it onto the end of a full-body routine.
- Warm-up (5 minutes): leg swings, hip circles, 10 bodyweight squats, and 10 calf raises. This increases blood flow to the knees and hips.
- Wall sit sets: 4 sets of 20-second holds with 45 seconds rest. Focus on the 3-3 breathing pattern. After each set, do the three-point form check.
- Cool-down (5 minutes): quad stretch (standing or lying), glute pigeon stretch, and a gentle hamstring stretch. Hold each stretch for 30 seconds without bouncing. This is a great time to do the 10-minute stretch routine we mentioned earlier.
Total time: about 15 minutes. That's all it takes to build a solid foundation with the wall sit. The key is consistency, not intensity.
Final Thoughts: The Wall Sit Is a Tool, Not a Cure-All
The wall sit is a fantastic exercise for beginners because it's low-impact, requires no equipment, and teaches you how to brace your core. But it's not a substitute for a well-rounded leg program. Use the Wall Sit Ladder to build a base, then progress to more dynamic movements like squats and lunges. If you're tracking your overall calorie expenditure, our Stacking Calories For Beginners Calculator can help you plan your nutrition around your workouts.
Most importantly, be patient with yourself. When I started, I couldn't hold 15 seconds without my knees screaming. I had to drop to 10 seconds for two weeks before I could progress. That's normal. The wall sit is a patience game -- it rewards consistency, not intensity. Stick with the ladder, check your form, and you'll be holding a clean 60-second wall sit by the end of the month. Your legs will thank you.